
Oh Glorious Cauliflower…what versatility you have!
The cauliflower is truly a glorious vegetable to those on LCHF. Who knew the versatility in the dishes it allows you to have!
Besides the known steamed cauliflower with the famous white or cheese sauce and it’s use in vegetable bakes, it is amazing in making an alternative to rice aka “cauli-rice” and also my latest find, wraps/tortillas!

Yah, for Cauli-tilla’s!!!
Ingredients:
- 500g Cauliflower
- 4 TBSP psyllium husks
- 2 eggs (large)
- 1/4 tsp salt
- almond flour or coconut flour (used for dusting)
How to make?
- Cook the cauliflower until it’s completely mushable, I prefer to steam the cauliflower, but you can also boil it.
- Then place on a clean tea towel, for it to absorb any moisture. Leave it on the towel for about 10minutes.
- Using a food processor or stick blender, puree the cauliflower until smooth.
- Add the p/husks, eggs and salt and mix well in the processor/blender. Leave to stand for 15 minutes, until it thickens.
Note, do not use eggs larger than large, since it adds too much moisture to the recipe. Also if you double the recipe, then try with 3 eggs first, if thats not enough to bind, then add the 4th, but I find 3 is enough. - Break the mixture into 6 separate size balls. Now use the “flour” for dusting and try to roll each ball out as thin as possible. You will find, it’s not easy to roll out flat, like a pancake, since the mixture is too moist & will stick to the surface, but a flatten version like below is easy – I use the base of my hand to do this! I flatten it then further, when in the frying pan, with a spatula or my hand.

Rolled out Cauli-tillas
- Dry fry each tortilla in a frying pan. Note, that you need to cook it at a low heat, so as not to burn it, and it takes a few minutes to cook each side. It should not be so pliable as below when you turn it – below, shows that it’s not yet ready to be turned. When ready, you will find the bottom firm-ish, and easy to turn (similar to a pancake, when it’s ready to be turned).
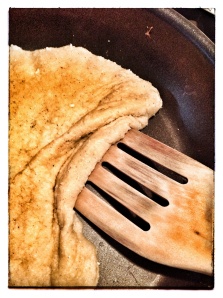
Dry Frying Cauli-tillas, not ready to turn yet
- And voila, it’s ready….
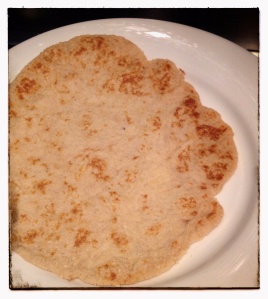
finished cauli-tilla
- It can be frozen. When freezing, wrap in individual layers via either cling wrap or tinfoil. I find, this is best to make ahead and freeze. Defrost when needed and warm up in the oven in tinfoil for 5-10minutes in a preheated oven of 170 degrees celsius. Note, I wrap them in tinfoil when heating up in the oven, to retain the moisture in the cauli-tilla!
Enjoy! Use as an alternative to a wrap or tortilla, they are just, if not more delicious.


I recently tried fried “fake rice” using grated cauliflower but this is superb! Thanks for sharing! This is good if I’m craving for chicken wraps and all other carby wraps.. Can’t wait to try these!
LikeLike
Let me know how it goes making them! They are well worth the effort, and I find although my eyes say I want two, I can only handle one. They are very filling, especially when packed with filling!
LikeLike
I’ve been doing LCHF for about 3 months & I can say that at first, I use to eat a LOT of veggies to satisfy my hunger. As I go along, I noticed that my portion intake is getting smaller. I’ll just eat one. Hehe.. Thanks for the heads up!
LikeLike
Well done! I’ve just done 2 months, and feel fantastic. It’s amazing how one’s appetite decreases, which was not the case when I ate high carbs, refined grains and sugar. Love your blog by the way!
LikeLike
Hi! I tried this recipe, but it came out with a gum consistency and couldn’t flip them over. I failed with this recipe and I was a long time in the kitchen so it was very frustrating. Do you have any tips for this not to happen again!
LikeLike
I am so sorry to hear this.
I have found the more I do them, the easier it becomes.
The following tips can be used to make it easier:-
– add more cauliflower, if you find the current mixture is too moist OR/AND
(my suggestion is for the normal size recipe, use 2 large cauliflowers then)
– add more cauliflower, if you find the texture too gummy in the sense of the “psyllium husk” taste/texture profile OR/AND
– blend the cauliflower but only after it’s cooked & drained, then put in a tea towel to squeeze out all the moisture, if you find the moisture is not getting removed enough from the tea towel i.e. boil/steam cauliflower, then drain it, then leave on the clean tea towel OR boil/steam, then drain, then blend, then squeeze in a clean tea towel AND/OR
– leave the ready mixed recipe in a bowl, with cling wrap along it’s surfaces overnight in the fridge & then use the following day OR two days later. This mixture keeps really well in the fridge for a few days, as long as the cling wrap is along the surface of the mixture, so it doesn’t harden. AND/OR
– use a lot of coconut flour and almond flour on the surface you are rolling on, as well as cover the ball you’ve made. Flatten by hand initially, then roll out, but it can’t be with hard pressure, otherwise it will stick to your rolling pin. Alternatively flatten by hand, and then put in frying pan, and stretch out with a spatula – doesn’t stretch as far as when using rolling pin.
– when cooking, make sure its “dry roasting” i.e. use a non-stick pan, with NO oil/butter etc. Heat it up first. Once hot, add the ‘-tilla’, let it cook a few minutes, it will start puffing out,and if you try and turn it too early the sides will be easily pushed in, so its ready when the sides aren’t as “malleable”, then turn over. Make sure oven plate is on medium heat (gas or electric).
Hope this helps!
LikeLike